
Streamline your personalized accessory workflow: 5 steps
TL;DR:
- A structured accessory workflow ensures timely, accurate delivery of branded items for events.
- Preparing essential assets and clear communication early prevents costly delays and errors.
- Incorporating quality checkpoints and emotional storytelling maximizes brand impact.
Picture this: your team arrives at a major corporate event, boxes of promotional accessories in hand, only to discover the enamel pins have the wrong logo color and the keychains arrived two days late. It’s a scenario that plays out more often than most organizations admit. Personalized accessories are powerful branding tools, but only when the process behind them is solid. This guide walks you through every stage of a reliable accessory workflow, from the first creative spark to the moment your team hands a beautifully crafted pin to an excited attendee.
Table of Contents
- Understanding the personalized accessory workflow
- What you need before you start
- Step-by-step accessory customization process
- Common pitfalls and quality checkpoints
- What most businesses overlook in accessory workflows
- Ready to streamline your accessory orders?
- Frequently asked questions
Key Takeaways
| Point | Details |
|---|---|
| Define each workflow stage | Following a clear process from concept to delivery reduces event surprises. |
| Prepare assets early | Gather your designs, requirements, and stakeholders before starting production. |
| Quality checks are crucial | Build verification steps into the workflow to ensure your accessories wow attendees. |
| Leverage expert resources | Using teamwork and specialist support streamlines your personalized accessory projects. |
Understanding the personalized accessory workflow
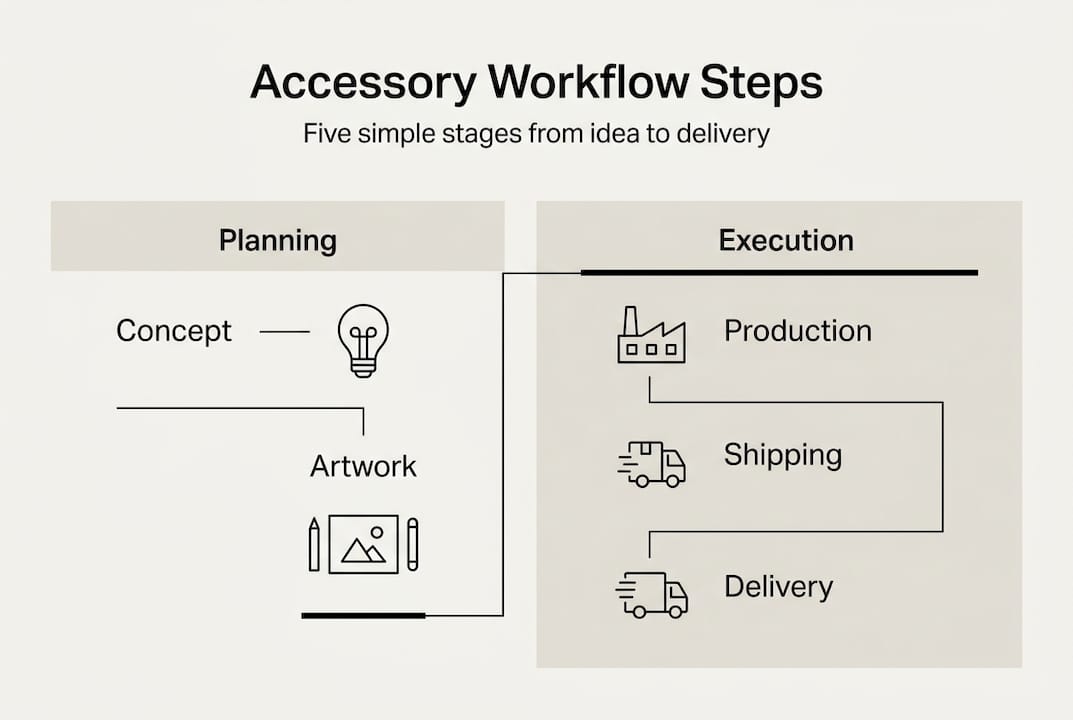
A personalized accessory workflow is the complete sequence of steps that takes a branding idea and turns it into a physical product in someone’s hands. Think of it as a relay race: every handoff matters, and dropping the baton at any stage costs you time, money, and credibility at your event.
The workflow typically moves through five core stages:
- Concept: Defining the purpose, audience, and visual direction of the accessory
- Design: Creating or refining artwork to meet production specifications
- Approval: Reviewing proofs and samples before full production begins
- Production: Manufacturing the final batch of pins, keychains, or magnets
- Delivery: Shipping, receiving, and quality-checking items before the event
Personalized accessories significantly enhance brand identity and event engagement when each stage is executed with intention. Skipping even one step, say, bypassing sample approval to save a week, can result in a full production run that misses the mark entirely.
| Workflow stage | Average time needed | Risk if skipped |
|---|---|---|
| Concept | 1-3 days | Misaligned product vision |
| Design | 3-7 days | Artwork errors in production |
| Approval | 2-5 days | Wrong colors or sizing |
| Production | 7-21 days | Delays, quality issues |
| Delivery | 3-10 days | Late arrival at event |
Understanding the merchandise benefits of a structured workflow helps organizations stop treating accessories as an afterthought. When you map out the full timeline early, you create space for creativity and quality rather than scrambling at the last minute.
Pro Tip: Build a shared project timeline with your vendor from day one. Assign owners to each stage so accountability is clear and no step falls through the cracks.
The biggest hidden cost in most accessory projects isn’t production. It’s revision cycles caused by unclear direction at the concept stage. Organizations that invest thirty minutes in a proper brief at the start consistently save days of back-and-forth later.
What you need before you start
Now that you know the workflow structure, here’s how to set the stage for a smooth process. Before you contact any supplier or open a design file, gather the essentials. Preparing corporate gifts and event accessories in an organized way saves brands time and prevents costly mistakes during customization.
Start with this preparation checklist:
- Brand assets: High-resolution logo files (preferably vector formats like .AI or .EPS)
- Color specifications: Pantone or CMYK color codes for accurate reproduction
- Order quantity: Minimum order quantities vary by product type, so confirm early
- Budget range: Know your per-unit ceiling before requesting quotes
- Event date: Work backward from this date to set every deadline in your timeline
- Accessory type: Decide between enamel pins, keychains, magnets, or a combination
| What you need | Who provides it | Why it matters |
|---|---|---|
| Vector artwork | Your design team | Ensures sharp, scalable production files |
| Pantone color codes | Brand guidelines | Guarantees color accuracy across batches |
| Order quantity | Internal stakeholders | Determines pricing tiers and lead times |
| Event deadline | Event coordinator | Anchors the entire production schedule |
| Product type decision | Marketing or leadership | Shapes design constraints and vendor choice |
Each accessory type carries its own design considerations. Enamel pins, for example, require artwork simplified to solid color fills without gradients. Keychains can accommodate more detail depending on the material. Magnets offer a flat printing surface that works well for photo-quality designs. Knowing which product you’re ordering before design begins prevents expensive artwork revisions.
Pro Tip: Loop in your internal stakeholders, including HR, marketing, and event leads, before the design phase starts. Their early input prevents last-minute change requests that derail production schedules.
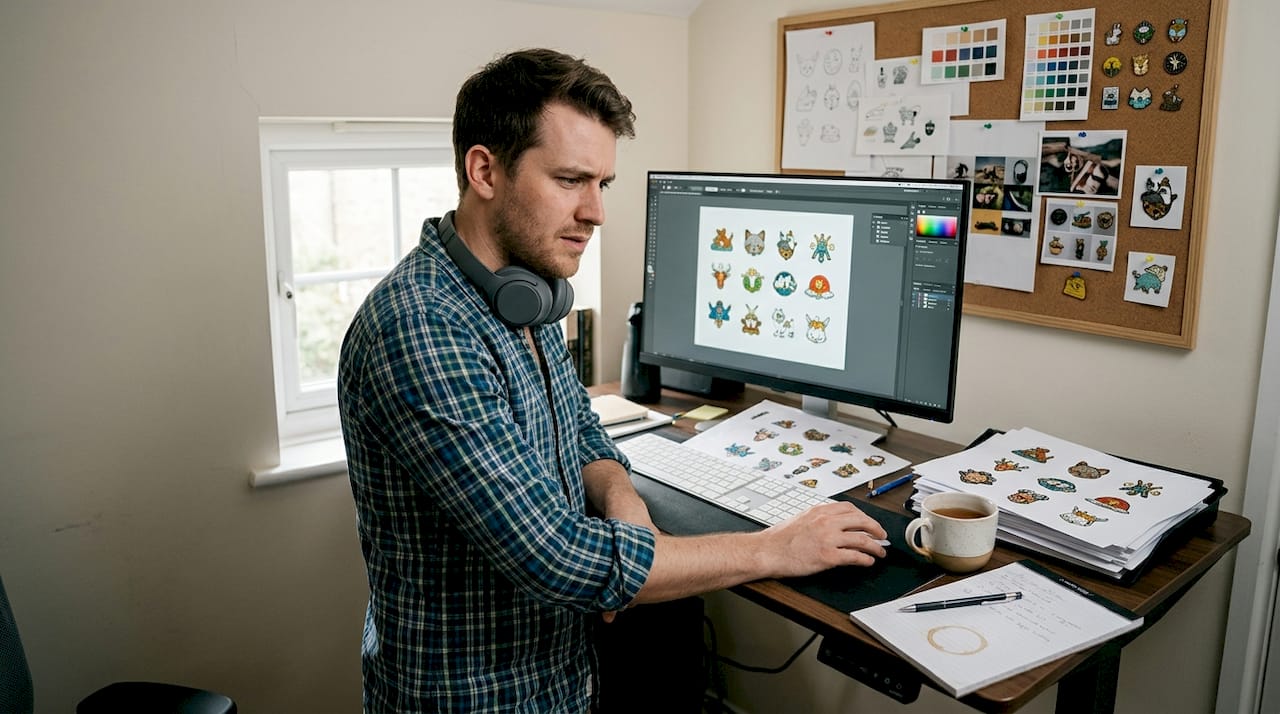
One often overlooked asset is a written creative brief. Even a one-page document describing the accessory’s purpose, target recipient, and emotional tone gives your vendor the context they need to guide you toward the right product and finish.
Step-by-step accessory customization process
With everything you need at hand, here’s exactly how to move your accessories from idea to tangible product. Following a defined sequence is what separates organizations that celebrate their event accessories from those who apologize for them. Well-defined customization steps boost accuracy and customer satisfaction at every stage.
- Ideation: Define the accessory’s message, style, and recipient. Is this a thank-you gift, a conference giveaway, or a team solidarity item?
- Design submission: Submit your artwork or brief to the production team. Confirm file formats, dimensions, and color mode requirements before sending.
- Digital proof review: Receive and carefully review a digital mockup. Check every detail: spelling, colors, proportions, and finish type.
- Sample approval: Request a physical sample for orders above a certain quantity. This is your last chance to catch issues before full production.
- Full production: Once you approve the sample, production begins. Maintain contact with your vendor for status updates.
- Delivery and inspection: Receive your order, inspect a random selection of items, and confirm quality before the event.
| Step | In-house workflow | Third-party workflow |
|---|---|---|
| Design | Internal designer | Vendor design team or uploaded file |
| Proof review | Internal approval | Vendor sends digital proof |
| Sample | Self-produced prototype | Vendor ships physical sample |
| Production | Internal manufacturing | Vendor facility |
| Quality check | Internal QA team | Shared responsibility |
Exploring a custom pin workflow or following a custom keychain guide gives you a clear picture of what each step looks like in practice for different product types.
Pro Tip: Schedule a brief check-in call with your vendor at the midpoint of production. A five-minute conversation can surface issues early and keep your timeline intact.
Common pitfalls and quality checkpoints
Even the best-run workflows can hit snags. Here’s how to dodge the most costly mistakes and make sure everything shines at your event. Most problems in personalized accessory orders are predictable and preventable when you know where to look.
The most common errors include:
- Vague or low-resolution artwork: Sending a JPEG logo pulled from a website almost always results in blurry or inaccurate production output
- Skipping the sample stage: Approving a digital proof alone means you won’t catch texture, weight, or color issues until the full order arrives
- Late internal approvals: Waiting for a single decision-maker to sign off without a deadline creates cascading delays across every downstream step
- Unclear finish specifications: Not specifying hard enamel versus soft enamel, or matte versus gloss, leads to a product that feels wrong even if the artwork is correct
- Ignoring packaging needs: Accessories that arrive loose or unprotected can be damaged before they ever reach an attendee’s hands
“Building quality assurance stages into your accessory workflow is not optional. It’s the difference between a product that represents your brand with pride and one that quietly undermines it at the moment it matters most.”
Brands should build in quality assurance stages to minimize event disappointment, especially when ordering across international supply chains where communication gaps are more likely.
Set up at least two formal checkpoints: one at the digital proof stage and one upon physical sample receipt. At each checkpoint, use a written checklist that covers color accuracy, text legibility, finish type, hardware function (for keychains), and overall dimensions. When ordering custom pins at scale, this discipline protects your entire investment.
Share the checklist with your vendor so both sides are evaluating the same criteria. This shared standard reduces subjective disagreements and speeds up the approval process significantly.
What most businesses overlook in accessory workflows
Most organizations treat their accessory workflow as a purely logistical exercise. Get the artwork right, hit the deadline, ship on time. That thinking gets the job done, but it leaves the most meaningful value on the table.
The real power of personalized accessories lives in their connection to your brand story. A pin isn’t just a pin. It’s a small object that someone chooses to wear or display because it means something to them. When the workflow is designed with that emotional layer in mind, the result is an accessory that generates genuine conversation and lasting brand recall.
We’ve seen organizations transform their event presence simply by involving a wider circle of voices in the design stage. When team members, community representatives, or even past event attendees contribute ideas, the final product carries a sense of shared ownership that no amount of polished graphic design can manufacture. Exploring your merchandise strategy through this lens shifts the workflow from a production task into a storytelling opportunity. That shift is where the most memorable brand moments are born.
Ready to streamline your accessory orders?
If you’re ready to put these steps into practice and simplify your next event accessory order, PinPerfect is ready to help. At PinPerfect, we’ve built our entire platform around making every stage of the workflow feel clear, collaborative, and rewarding for businesses and organizations like yours.

From your first design conversation to the moment your accessories arrive event-ready, our team guides you through each step with expertise and genuine care for your brand’s story. Whether you need enamel pins that celebrate your culture, keychains that carry your logo with pride, or magnets that keep your brand visible every day, explore our full range of personalized accessory solutions and start your next order with confidence. Your event deserves accessories that truly represent who you are.
Frequently asked questions
How long does a typical personalized accessory workflow take?
Most workflows take 2 to 6 weeks depending on design complexity and order volume. Building in buffer time at the start protects you from delays caused by revision rounds or shipping variables.
What assets do I need to start a custom keychain or pin project?
You’ll need your logo or artwork, production quantity, budget, and event date. Creative assets and event details are the foundation that allows any vendor to give you an accurate quote and timeline.
Should quality checks be done before the event?
Yes, verifying samples and final products before the event prevents costly errors. Quality assurance is essential in all personalized accessory workflows, especially for large orders where a single defect type can affect hundreds of units.
What if my team can’t agree on a design?
Involve a neutral decision-maker or use feedback rounds with clear deadlines to reach consensus. Structured feedback and defined approval windows keep the design process moving without sacrificing team buy-in.