
Custom pin creation guide: easy steps for unique results
Ordering custom pins sounds straightforward until your factory sends back a proof that looks nothing like your vision. Lines bleed together, text becomes unreadable at small sizes, and suddenly your event deadline is two weeks away with no approved sample in hand. These frustrations are common, but they are entirely avoidable. Whether you are a business building brand recognition, an event coordinator creating memorable giveaways, or an individual designer turning a passion into a product, this guide walks you through every stage of the custom pin process, from choosing the right pin type to approving your final production run.
Table of Contents
- Understanding custom pin types and uses
- Planning your custom pin: Requirements and preparation
- Step-by-step guide: From idea to production
- Common design mistakes and troubleshooting
- What to expect: Cost, production time, and delivery
- Ready to bring your custom pin to life?
- Frequently asked questions
Key Takeaways
| Point | Details |
|---|---|
| Choose the right pin type | Different pin types suit different needs—understand their cost, look, and durability before you start. |
| Design for manufacturability | Follow line thickness, color, and text size guidelines to avoid common production errors. |
| Use vector files and Pantone colors | Vector files with precise color codes are essential for factory accuracy and a professional result. |
| Plan for costs and timelines | Expect at least 2-3 weeks production after approval and minimum orders as low as 50-100 pieces. |
| Check details before final approval | Always review a proof at real size to spot design or text issues before manufacturing starts. |
Understanding custom pin types and uses
To start your custom pin project, you need to understand the main styles and their strengths.
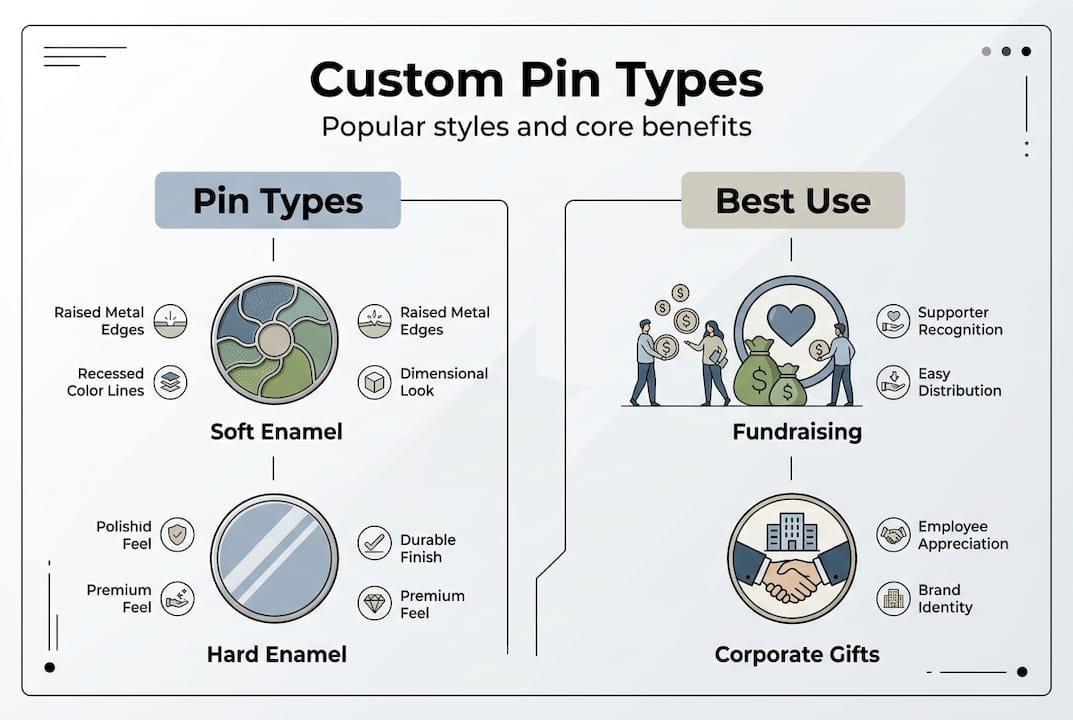
The four industry-standard pin types each serve a different purpose. Soft enamel pins feature recessed, textured colors and are the most popular choice for promotional merchandise because they offer more plating options at a lower cost. Hard enamel pins have a smooth, glass-like surface that feels premium and lasts longer, though they cost more and offer fewer plating finishes. Die-struck pins skip the enamel entirely, relying on metal relief for visual impact, making them ideal for elegant corporate awards. Offset printed pins use a digital printing process that supports gradients and photographic detail, which the other types simply cannot achieve.
Understanding the custom pin benefits for your specific goal helps you choose wisely. Soft enamel works beautifully for event giveaways and cultural gifts. Hard enamel shines for collector series and high-end branding. Die-struck suits minimalist logos. Offset printed fits complex artwork.
| Pin type | Texture | Durability | Relative cost | Ideal use |
|---|---|---|---|---|
| Soft enamel | Textured, recessed | Moderate | Low | Promos, events, cultural gifts |
| Hard enamel | Smooth, flat | High | Medium-high | Branding, collector pins |
| Die-struck | Metal relief only | Very high | Medium | Corporate awards, lapel pins |
| Offset printed | Smooth | Moderate | Medium | Complex art, gradients |
For organizations running pins for fundraising, soft enamel is almost always the smart starting point. It balances visual appeal, cost efficiency, and production speed in a way that hard enamel simply cannot match at scale.
Planning your custom pin: Requirements and preparation
After choosing a pin style, gather what you need for a smooth design and production process.
Before you send a single file to a factory, you need to have several decisions locked in. Your logo or design sketch, brand colors expressed as Pantone codes, preferred metal finish (gold, silver, black nickel), backing type, and target quantity all need to be confirmed upfront. Skipping any of these creates back-and-forth delays that push your timeline out by days or even weeks.
Design rules are non-negotiable in pin manufacturing. Key design requirements include a minimum metal line thickness of 0.2 to 0.3mm to separate colors and prevent bleed, a minimum enamel fill area of 0.3mm wide, and text set at no smaller than 5 to 6pt. Stick to a maximum of 4 to 6 base colors, since each additional color adds cost. Vector files in AI or EPS format with Pantone codes are the required standard.
| Design element | Minimum requirement |
|---|---|
| Metal line thickness | 0.2 to 0.3mm |
| Enamel fill area | 0.3mm wide |
| Text size | 5 to 6pt minimum |
| Color count | 4 to 6 base colors max |
| File format | Vector (AI or EPS) |
| Optimal pin size | 1 to 2 inches |
Here is a numbered preparation checklist to follow before contacting any factory:
- Finalize your concept and sketch the design at actual size.
- Convert all artwork to vector format using Adobe Illustrator or a similar tool.
- Identify every color with its exact Pantone code.
- Decide on pin size, metal plating, and backing type.
- Confirm your quantity and budget range.
- Review the design for cultural or religious sensitivities if it includes symbols.
- Use the custom pin checklist to verify nothing is missing before you reach out to suppliers.
Pro Tip: Print your design at its actual intended pin size before sending files. What looks crisp on a 27-inch monitor often becomes a blurry mess at 1.5 inches. This one step catches most readability problems before they cost you a revision round.
If your design includes cultural or religious symbols, take time to research local sensitivities. At PinPerfect, we work with clients on Israeli cultural themes regularly, and thoughtful symbol use always strengthens the final product’s meaning.
Step-by-step guide: From idea to production
Now that you have your plan and files, let’s move through the actual pin creation process.
The pin production timeline follows a predictable sequence once you understand each stage. Most factories set a minimum order quantity (MOQ) of 50 to 100 pieces, and production runs 2 to 3 weeks after final design approval, not counting shipping time.
Follow these steps in order:
- Validate your idea. If you plan to sell pins, search Etsy using the sold filter to confirm real demand before investing in production.
- Create your vector design. Use Adobe Illustrator or Canva Pro to build a clean, scalable file with Pantone colors labeled.
- Choose your pin type. Revisit the comparison table above and confirm your choice based on budget and finish goals.
- Request factory quotes. Send your vector file, Pantone list, size, quantity, and plating preference to at least two or three suppliers.
- Review the digital proof. Check every line, color, and text element carefully before approving.
- Approve and pay the deposit. Most factories require 30 to 50 percent upfront.
- Confirm the physical sample. Request a pre-production sample if your order is large or the design is complex.
- Approve production and pay the balance. Once the sample is confirmed, production begins.
- Receive and inspect your shipment. Check a sample from the batch against your approved proof immediately.
For pin manufacturing steps that involve collaborative design work, sharing reference images alongside your vector file speeds up the quoting process significantly.
Pro Tip: Starting with 100 pins gives you the best unit price without overcommitting inventory. It is the sweet spot for testing a new design before scaling up.
Quality warning: Ultra-cheap factory quotes often signal shortcuts in metal thickness, plating quality, or enamel fill. A price that seems too good is usually a sign of corners being cut. Always request a physical sample before approving a full production run.
Common design mistakes and troubleshooting
Even with a clear plan, a few common errors can cause delays or costly re-dos. Here is how to avoid them.
The most damaging mistakes happen at the design stage, long before a factory ever sees your file. Catching them early saves both time and money.
- Lines thinner than 0.2mm will bleed into adjacent enamel areas or collapse entirely during stamping. Always check line weights in your vector file before exporting.
- Too many colors drive up cost fast. Every color beyond six adds a setup fee. Simplify your palette wherever possible.
- Raster files (JPG or PNG) cannot be used for production without conversion. Factories need vector files to maintain precision at any size.
- Text smaller than 5pt becomes unreadable on a finished pin. If your design includes a tagline or small label, increase the font size or remove it.
- Overly complex or busy designs lose detail at pin scale. What works as a poster illustration rarely translates well to a 1.5-inch metal surface.
According to common pin mistakes research, thin lines under 0.2mm cause bleed or collapse, and designs with more than six colors significantly increase production costs. Using black or white metal for line art creates strong contrast that compensates for fine detail limitations.
Critical reminder: Never send a JPG or PNG as your primary design file. Even if a factory accepts it, the output will lack the precision that vector artwork guarantees. Always supply AI or EPS files.
When reviewing your factory proof, check these elements specifically: line integrity, color accuracy against your Pantone codes, text legibility, and overall proportions. A printed proof at actual size, not a screen preview, is your most reliable quality check. The branding pins guide covers proof review in detail for corporate orders.
What to expect: Cost, production time, and delivery
With your files sent and design approved, here is what happens next and how to budget and plan for delivery.
Cost varies based on pin type, color count, plating choice, and order quantity. Here is a realistic breakdown for standard soft and hard enamel pins:
- Soft enamel at 100 pieces: roughly $1.50 to $2.50 per unit
- Soft enamel at 500 pieces: roughly $0.80 to $1.20 per unit
- Hard enamel at 100 pieces: roughly $2.50 to $4.00 per unit
- Hard enamel at 500 pieces: roughly $1.20 to $2.00 per unit
- Additional colors beyond six: add $0.10 to $0.30 per unit per color
- Special plating (rose gold, black nickel): adds $0.15 to $0.50 per unit
The specialty pin market was valued at $3.2 billion in 2024 and is projected to reach $5.1 billion by 2033, reflecting strong and growing demand for custom pins across retail, corporate, and cultural sectors.
For businesses planning to resell, retail prices typically range from $12 to $25 per pin, which translates to margins of 400 to 1,000 percent on production costs. Limited drops via Instagram or Shopify consistently outperform always-available listings in terms of urgency and sell-through rate.
Timeline expectations are straightforward: production takes 2 to 3 weeks after final design approval, and shipping adds another 1 to 3 weeks depending on your location. Plan your magnetic pin workflow or standard pin order at least 6 to 8 weeks before your event or launch date to avoid stress.
Variables that affect your final cost include packaging (individual backing cards add cost), rush production fees, and the complexity of your die shape. Simple geometric shapes cost less to stamp than intricate custom outlines.
Ready to bring your custom pin to life?
Once you know what is involved, make your project hassle-free with a trusted supplier.
At PinPerfect, we make the journey from concept to finished pin as smooth as possible for businesses, event coordinators, and individual designers. Our in-house team collaborates with you on design refinement, Pantone color matching, and proof review so nothing gets lost in translation between your vision and the factory floor.

Whether you are ordering 50 pins for a community fundraiser or 5,000 for a corporate campaign, we offer worldwide shipping and dedicated support at every stage. Our global pin ordering guide walks you through the full process, and our team is ready to help you get started today. Reach out, share your idea, and let us help you create something meaningful.
Frequently asked questions
What file type is best for custom pin design?
Vector files like AI or EPS are best because they preserve line thickness and allow precise color matching with Pantone codes. Raster formats like JPG or PNG cannot guarantee the precision factories require.
How many pins do I need to order at minimum?
Most factories require a minimum of 50 to 100 pieces for custom pin orders. Starting at 100 units typically gives you the best balance of unit cost and manageable inventory.
How long does it take to make custom pins?
Production takes 2 to 3 weeks after design approval, plus shipping time to your location. Budget 6 to 8 weeks total from first contact to delivery for a stress-free timeline.
What’s the main difference between soft and hard enamel pins?
Soft enamel pins have a textured, recessed surface with more plating options and a lower price point, while hard enamel pins are smooth, highly durable, and carry a premium feel and cost.
Can I use gradients in my pin design?
Gradients are not recommended for enamel pins because the process requires solid Pantone colors. Offset printing is the one exception if gradient artwork is essential to your design.